E-shop Settings
The E-shop Settings application sets up the behaviour of your e-shop. Select the Branch that checks out the orders, Checkout with defined Payment Methods that can be used for payments, E-mails and Documents that will be sent to customers, accounting information and Website and Zone (or Zones) for which you are defining this particular E-shop setting.
To make your e-shop functional it is necessary to set up the E-shop Settings, because the ability to sell something to a customer is dependent on the e-shop setting for the customer’s Zone. Customers from Zones without defined e-shop settings are not able to buy anything. Every e-shop setting (one record in the E-shop application) is bound to a Website (on which the e-shop is running) and a Zone (or Zones).
General tab
Identification
The General tab includes identification fields Name (required), Internal Name (required) and Description (optional). All serve only for your own and internal purposes and are never visible to visitors.
Specification
E-Shop Type - There are 3 types of e-shops in BizBox. You can have a normal online store (Standard) which allows your customers to purchase your products or services online. The second type is the Catalog. A Catalog is not used for direct shopping and your customers (which can be called clients in this context) create requests instead of orders. Catalog can be used as a channel for B2B sales. For more info see the Catalog part. The third type is the Cash Register. It is used for selling in person. For more info see the cash register settings section (cash register settings and cash register orders are available only on accounts with the Cash Register addon).
Website (required) on which is the e-shop is running. You can have more E-shop Settings per one Website. The number is dependent on the Zones you want to use for the Website.
Branch field (required) defines a Branch that will be checking out all orders of customers from the Zone or Zones you have to select below. It means that you can use different Branches for different Zones on the same Website.
Checkout field (required) defines the Checkout Settings that will be available for customers from the Zone or Zones you have to select below. It defines the combinations of Payment and Delivery Methods your customers can use.
Zones (required) allows you to specifically select a Zone or Zones for which you are creating these settings. You will be able to create only one E-shop setting per one Zone (per Website). It means, that in case you select a particular Zone in an E-shop setting, you will not be able to select it in another E-shop setting again.
Stock Service (optional) allows you to select one of the previously added Stocks that you want to use for this e-shop.
For Online Sale setting defines e-shop, which will be used on the web. Your customers will be able to use it for their orders. YES is a default value and you will probably not need to change it, because you will have one e-shop setting per one Zone. It is used in case you need to have more e-shop settings per one Zone when you are creating your orders manually. In case you do, you can create another e-shop settings for the same Zone and set this flag to NO. Thus created e-shop settings won’t be used on the website for customers, it will be internal and prepared only for manually created orders. E-shop Settings with For Online Sale setting set to NO are not available on the website and customers cannot use it for their orders. Only you are able to use it when you are creating an order manually.
Unpriced Products setting sets up the display of products that don’t have their price (in the Pricing module) defined. Option YES means that products without price will be displayed on the website. Option NO will always hide products without price and the customer will not be able to see them.
Only Available Products option YES displays only available products (product is in stock and its marketability is set to ‘until sold out’ or the marketability is set to ‘always’) on the website.
Unstored Products setting is used in case you are using a stock to dispatch your orders. Option YES will display all products regardless their stock availability on your website. Option NO will display only products that are currently in stock and available to buy. This setting is enabled only when the Only Available Products setting is set to NO.
Manual Stock Dispatches setting allows you to send orders to a stock manually. It means that orders will be stored in BizBox until you manually mark every order and click the button which sends it to a stock. This setting will affect only orders that contains at least one physical product. If you turn this setting off, all orders will be dispatched to a stock automatically (all paid and cash on delivery orders).
Variable Symbol determines what will be used as a variable symbol - System Order Identifier (Order ID) or Order Number (defined by used Document Sequence). To display the variable symbol on e-shop documents and e-mails use the order.variableSymbol parameter. This identifier will also be sent to linked services (payment gateways, carriers, Balíkobot,…).
Website Users
Register Customers flag will automatically create a new account (contact) to your customer along with the order. This customer will be automatically logged in and he/she has to set up the password by using the link in the registration email. To an already registered customer who buys unlogged will not be his/her account recreated or he/she will not be logged in automatically.
Catalog E-shop Type
Catalog is a special type of e-shop. It is not used for purchase, but only for product presentation.
Documents tab
The Documents tab allows you to add Documents that can be automatically generated (according to the settings) and that can be automatically sent to your customers (according to the e-mail settings on the E-mails tab).
There are 5 types of e-shop documents. It is absolutely not necessary to define all of them. For a standard online store you will probably need only the Invoice, Credit Note and maybe the Proforma Invoice in case you use an advance payment (such as bank transfer) as a payment method. Some of them are used only in case you have a catalog (a type of an online store), some only in case you are using a stock service.
Credit Note is a document issued to correct the invoice or in case the seller (you) is crediting some amount to customer’s account. It is generated in case you are refunding an order. Without setting the template, it will not be possible to refund the order.
Invoice is a e-shop document provided by the seller (you) to the customers in the product transactions. It identifies the trading parties, purchased items and the whole transaction.
Order can be used both as an e-shop and as a catalog document. It provides information about an order in case you can’t or don’t want to use the invoice. Invoice is an obligatory accounting document, order is only an informative document about the order. It can be automatically sent as a part of the Purchase Confirmation E-mail in case you use some external accounting system that is not connected with BizBox and you don’t want to send invoices from BizBox because you will send them from the a particular external accounting software.
Packing List is a document used in case your online store is connected with a stock service. It is a list with detailed information about purchased products that are included in a package you are sending to a customer. For more info see the Packing List page.
Proforma Invoice is a document provided by the seller (you) to the customer in advance of a delivery of products. It is send as a part of the Order Confirmation E-mail in case the customer selected a advance payment (most likely a bank transfer) as a payment method.
Note
In case you want to send a document to a customer automatically, you have to assign it on the E-mails tab to a concrete e-mail as its attachment.
Add a New Document
Click the Add button located in the toolbar.
A new window with 2 tabs appears.
On the first General tab fill in both required fields and generating setting.
In the Type field select the type (Credit Note, Invoice, Order, Packing List or Proforma Invoice) you want to add.
In the Template field the Template you want to use. Template is the content of the selected Document Type. It is necessary to create the Template first on a Website in the Templates application.
The Generate Automatically setting determines if this document will be generated automatically according to the state of an order. Some documents don’t have this setting and are always created manually:
Invoice – it is generated automatically when the order is paid; the exception is purchase on invoice and cash (or card) on delivery, where it is generated when the order is created – this can be influenced by setting Generate When CoD Paid (even for cash on delivery, the invoice will be generated upon payment).
Proforma Invoice – it is generated automatically when the order is created.
Credit Note – it is generated automatically when the order is refunded. Without setting the template, it will not be possible to refund the order.
Order – is never generated automatically.
Packing List – it is generated automatically when the order is paid; the exception is purchase on invoice and cash (or card) on delivery, where it is generated when the order is created.
If you switch this setting off, you will have to create this document manually in a particular order detail. Some documents don’t have this setting and are always created manually.
Generate When CoD Paid setting is available for the Invoice – This setting is only used for cash (card) on delivery orders: it determines whether the invoice will be generated when the order is created (NO) or when it is paid (YES)..
On the second Payment Methods tab a list of all payment methods is located connected to these E-shop Settings (according to the Checkout selected on the first tab). Define for which methods the particular document will be selected on the first tab automatically generated. For unselected methods the document will not be generated. Generated documents are available in a particular order detail on the Documents tab, where you are also able to regenerate them in case the order has been changed (this can typically be a customer information or ordered products). The Without Payment gateway is automatically used for orders that are free of charge.
Click the Add button. Assign as many Documents as you and your e-ship type requires. Don’t forget to save the changes and approve the project to make the changes functional on your website.
Note
Don’t forget about the Document Sequences (defines a unique number of the document) that are necessary to generate an e-shop document. Create them in Document Sequences application and subsequently connect them in the E-shop Settings on the Accounting tab. Every e-shop document must have its own document sequence defined.
E-mails tab
The E-mails tab sets the e-mails that will be sent to your customers. E-mail assigned here can be sent automatically after a particular action occurs (order has been placed, order has been paid) or manually in an order detail.
Note
Remember that this is not the only setting where you define the e-mails sending. In case you want to add e-mail for registration or forgotten password you have to go to the website settings and define it in the Security application.
There are 12 e-mail types you can assign here. You are able to add one e-mail type as many times as you need according to the payment methods you use on your online store. it means that you can define different e-mail templates for every payment method you offer (the order confirmation e-mail for bank transfer can be different from the one for credit card).
Abandoned Cart can be sent automatically or manually (from the Abandoned Cart application located in the Sales module) for logged customers who have abandoned the cart. Abandoned Cart E-mail can be used only if you have the Abandoned Carts addon available in your account.
Claim is used in the Claims application in the Sales module. The content defined by this template is send to a customer which is connected with a particular claim.
Customer Alert is sent automatically to a customer when the products your customers are interested in become available.
Dispatched Order can be sent automatically to a customer when the order has been dispatched.
Follow-up e-mails are sent to customers after a defined number of days from the purchase or payment. This can be a very effective marketing strategy. Thanks to this you can send surveys (to get interesting feedback) or sales offers (to increase your sales).
Order Confirmation is (can be) automatically send to a customer who creates an order on your online store. This e-mail should contain basic info about the order (names of purchased items, their price, information about payment and delivery as well as information about the Branch that is dispatching it). According to used payment method, you can assign the Proforma Invoice document as an attachment of this e-mail.
Order State Change e-mail - manually sent e-mail used to inform customer about an order state change.
Payment Reminder is intended to be sent to your customer a few days after the due date on the invoice. This process is not automatic, you have to send this e-mail manually.
Price Offer is used to send your potential customer an offer to buy your products. You will create a new order in the Sales module and click the “Send an Offer” e-mail to a customer. In case a customer accepts the offer, he/she will click the button (necessary part of the e-mail) and a page with the order confirmation will be displayed in his/her web browser. This is not a part of the catalog type e-shop connected with the Offer document.
Purchase Confirmation is (can be) automatically sent to a customer when the order is marked as paid. This e-mail type should contain basic info about the purchase (such as dates, purchased items, their price, selected payment and delivery method and information about a Branch which is dispatching it) and it can also contain an invoice as an attachment.
Ready to Pick Up is used to send your customers information that their order has been prepared for personal pick up. It should contain basic info about the order and pick up point - address and the best time for pick up.
Shipment Handed Over to Carrier is sent to the customer when you hand the package over to a particular carrier. Apart from base order info can this e-mail contain tracking numbers added to customers order.
Newsletter Subscription Voucher is sent to the customer when he/she subscribes to the newsletter defined in the e-shop settings.
Add a New E-mail
Click the Add button located in the toolbar.
A new window with 2 or 3 tabs appears. 3 tabs are displayed in case you want to add a Follow-up e-mail type.
On the first General tab fill in at least all required fields:
E-mail Type - define the type of the e-mail you want to add.
Template - assign a particular template (previously created on a Website in the Templates application) to the e-mail type selected above.
From Label - insert e name of the sender. This can typically be a name of your website.
From - insert an e-mail address from which you want to send this e-mail.
Subject - define the subject of this e-mail. This can typically be a name of your website and the purpose of this e-mail. In subject, you are able to use Twig marks. All parameters available in the e-mail are also available for the subject.
Set Custom Recipient allows you to specify the To field (below). Typically, you will insert a parameter which carries email address of phone number (SMS notification). To provide the email address defined in a partner detail, use the order.partner.billingEmail parameter.
To - there will always be a customer’s e-mail address. It will be taken from his/her account (Contacts application). If you need to specify the recipient, turn on the Set Custom Recipient flag.
Cc - insert an e-mail address (or coma-separated e-mail addresses) to which will be sent the carbon copy of this e-mail.
Bcc - insert an e-mail address (or coma-separated e-mail addresses) to which will be sent the blind carbon copy of this e-mail.
Send Automatically - Option YES sends this e-mail automatically (according to order state). If you want to send all e-mails manually from an order detail, use the option NO.
Note
If you want to use the Cc and Bcc settings as a notification about new order for yourself, use the Notifications application in preference. Here you can set up the sending of notifications for much more than only placed and paid orders.
On the second Payment Methods tab select the methods for which will be this e-mail sent. In case a customer uses one of the checked methods, the e-mail will be automatically sent (according to its type). The Without Payment gateway is automatically used for orders that are free of charge.
In case of Follow-up e-mail are on the last Advanced tab located settings for sending of this e-mail type. Define after how many days will be the e-mail sent and the event type.
Add this e-mail.
Attachments are added in the grid with all e-mails displayed (E-mail tab in this E-shop Settings). Click the action button on the right side and select “Add e-mail attachments.”
A new window will appear. Click the Add button:
Fill in an internal name of this attachment (it will be never displayed to customers).
Select an e-shop document (invoice, proforma invoice, …) that will be attached to this e-mail (documents are defined on the Documents tab in this E-shop Settings).
Or you can select a file from the File Manager that will be attached to this e-mail.
If you are selling coupon cards (product of the Voucher type), you can set that the coupon card (PDF) will be send as an attachment.
You can add as many attachments as you need.
Don’t forget to approve your project.
Note
Remember that you have to create templates (the content) for your e-mails on a Website in the Templates application.
SMS Notification
On the E-mails tab an SMS notification can also be set. Remember that BizBox itself is not sending any SMS; you need to use an SMS gate provider.
Add a new E-mail.
Select the E-mail Type you want to send to the customer.
Select the template (content) of this e-mail; the template has to contain the template for an SMS.
In the From field insert the e-mail address which is bounded with the SMS gate provider.
Set the Custom Recipient Setting to YES. It allows you to define a customer’s telephone number to which an SMS will be sent.
In the To field insert phone number of the customer to which will be the SMS sent: {{ order.shippingAddress.internationalPhone }}@smsgateprovider.com.
On the second Payment Methods tab select the methods for which will be this SMS sent. In case a customer uses one of the checked methods, the SMS will be automatically sent (according to its type).
Don’t forget to approve your project.
Accounting tab
Prices and Calculations
Prices and Calculations allows you to define how the rounding of Prices and Taxes will be calculated.
In case you use more than one currency on your online store, this setting will be applied as a default for every currency you use. If you want to create different rounding for different currencies, you need to use the Rounding part. It allows you to define rounding for every used currency separately. The settings in Rounding will be used in preference to the Prices and Calculations settings. Rounding by selected payment method – rounding of the order can be defined according to the payment method of the order. Add a new rounding (in the Rounding section), where you can also select the payment method to which the setting should apply.
If the Accounting Currency setting is not defined for some currency used on your online store, the Prices and Calculations settings will be used automatically.
Order Total Amount determines the rounding of the order price. This price is displayed on the Invoice and this is the final price the customer has to pay.
Order Total Tax determines the rounding of the taxes. You can round the total Tax or each Tax Rate separately.
Invoicing
Payment Due Date is the date when payment should be received by the seller of the order (e.g. your company). The inserted number is the count of days after the Invoice Issue Date. This setting is used only for Bank Transfer payment method.
Tax Point Date is the date on which is based the tax liability. It is set to 0 as a default.
Document Sequences
Document Sequences allows you to select a previously created Document Sequence you want to use for this E-shop Settings. Document Sequences are used to generate a unique numbers for e-shop documents (such as invoices, credit notes or proforma invoices) and for orders.
Account Identification and Account Assignments
Account Identification and Account Assignments fields serve only for exports to your accounting software and are never visible to a customer. In case you fill in those fields, you can subsequently download the Invoices in the Orders application (Sales module) and upload them to your accounting software. Those exports will contain the Account Identification and Account Assignments fields.
Accounting Currencies
Accounting Currency is used only in case you are selling in two or more currencies.
If you sell in more currencies, you probably need to set the accounting identification (or assignments) differently for each currency you use. This can be done thanks to the Accounting Currencies - here you add a currency and define the settings for it. Remember, that you have to add the currency you want to use here in the Currencies application located in the Administration module first. Select a currency for which you want to define these settings which will be used in preference to the values set above.
E-shop Documents Texts
E-shop Documents Texts are fields used only for purposes of your accounting software. Data inserted here cannot affect the behaviour of your online store at all. Use them only in case you want to export Invoices and Credit Notes created on this online store into some accounting software. Otherwise leave these fields blank.
Invoice Introduction field is used to insert a short introduction (preamble) for invoice. Typically it can be something like a “We bill you according to your order at your online store”. In this field you are not able to use any parameters or special marks.
Credit Note field is used as a Credit Note preamble. Typically it can be something like a “Credit Note to the invoice - tax document no. {invoice.number}”. In this field you are able to use the parameter {invoice.number} that automatically displays the number of invoice connected to this Credit Note.
Discount Product Label field is used to define the information that a particular product was sold for a discount price. In this field you are able to use the parameters {item.name} (displays the name of the discounted product) and {discount.name} (displays the name of the discount).
Proforma Invoice Label field is used as a label for Proforma Invoice. It can be displayed on Invoice generated for order with Proforma Invoice. In this field you are able to use the parameters {proformaInvoice.number} (displays the number of the Proforma Invoice) and {order.paymentDate} (displays the date of order payment).
Advanced tab
This tab is used for setting up advanced functions, such as limits for shopping, order rating or automatic issuing of vouchers for every order placed/first order on your online store. These settings are not vital for your online store and are optional.
Order Rating
Order Rating allows you to connect a rating service to your online store. Your customers will be able to write reviews on your store on this specialized shopping portal (rating service). This is a great marketing feature.
Note
Partner orders are not sent to rating services.
To make it work, you have to set up an account on a particular rating service (Heureka, Heureka SK or Zboží.cz) and insert its:
API key - The API key and/or Shop ID are provided by the rating service. This connection guarantees that to your customers will be sent e-mail with a rating form or conversions will be measured.
Shop ID - used only for Zboží.cz. It is provided by the rating service.
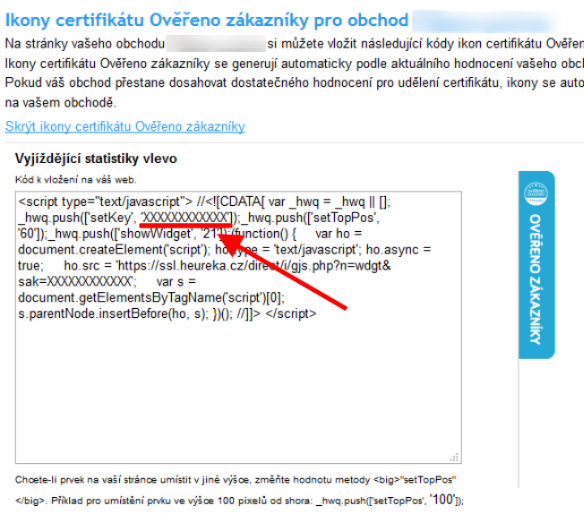
Public Key - used only for Heureka.cz or Heureka.sk in case you want to use the Heureka ratings (see the secion below). The Public Key can be found in the Heureka Settings. Go to the Správa e-shopů and select Ověřeno zákazníky from the left menu. Here display the Zde naleznete různé podoby ikon certifikátu Ověřeno zákazníky option. The public key has to be taken directly from the available codes. See the image below. The red-marked code is the public key you need.
Pixel ID – used only for Facebook. The Pixel ID can be found in the Facebook settings.
Available services:
Heureka.cz
Heureka.sk
Zboží.cz
Facebook
Heureka Ratings
Heureka ratings (customers’ ratings and opinions) can be displayed on your website. To make this feature work, you have to set up the settings discussed above (API Key, Public Key) and modify the website code using e-shop settings external ratings parameters. Available Heureka parameters are:
ecommerce.eshop.externalRatings.heurekaCz
ecommerce.eshop.externalRatings.heurekaSk
Heureka Product Ratings
You can also display reviews of specific products your website. Only product ratings rated by your customers are available. This is not an overall review from Heureka.
To display all product ratings on your website, these parameters are available:
ecommerce.products.getExternalRatings().heurekaCz
ecommerce.products.getExternalRatings().heurekaSk
It contains all ratings and reviews of products rated by your customers (in the last half year). Display information about the External Product Rating object in the Data Structures section.
Use this function to view ratings for a particular product (the same for heurekaSk):
ecommerce.products.get('productCode').externalRatings.heurekaCz
Instead of the productCode insert a real code of a product for which you want to display the rating.
Note
Ratings are matched according to EAN of your products.
Vouchers for Paid Order
This setting is used to define what Vouchers will be distributed along with the Purchase or Order Confirmation e-mails. Select the Vouchers (previously crated in the Pricing module) that will be automatically distributed as a reward for an order. Remember that to make this feature work you have to change the Purchase/Order Confirmation e-mails. For more information visit the related Help-site.
Order Access
Order Access allows you to generate special URL address that can be send as a part of order e-mails and allows the customers direct access to the detail of their orders on your website.
If this token exists, in a particular order detail (Orders application) links to the order detail page will be available. One is a part of the Order Info (together with the token validity) and the second is available in the upper right corner next to the order number.
To make this feature work, you have to follow these steps:
Go to the Administration and run the E-shop Settings application. On the Advanced tab turn on the Order Access (enable the generation of a token). You can also set up the expiration time of the generated token (time for that will be the URL address functional).
Go to the Website Editor and create a page that contains information about the customer’s order (in case you have the whole User Portal, you can use the usual page which displays the detail of the customer’s order).
Go to the Tools and Settings and run the Special Pages application. Here you have to assign the page created in previous step to the Special Page named Order Detail (Token Access).
Edit the Order Confirmation or Purchase Confirmation e-mails (depends on where you want to display the URL address, and yes, you can display it in both of them). The parameter {{ order.orderDetailUrl }} carries the concrete URL address. You can use this piece of code in the e-mail:
{% set escapedLink = order.orderDetailUrl | escape %}
{% set orderLink = '<a href="%s">%s</a>' | format(escapedLink, _('link')) %}

        {{_('To display this order on the website, use this %s.') | format( orderLink ) | raw }}
Approve your project!
Note
Follow the Download Invoice Using the Access Token knowledge base article to allow your customers to download e-shop documents directly from the order detail page.
Cart Constraints
Minimum Quantity defines the minimal number of items which have to be inserted into the shopping cart. Customers cannot place an order which contains less products than set.
Maximum Quantity defines, how many items can be inserted into the shopping cart. Customers cannot order more products. If this situation occurs, a system message appears. You can change it according to your needs in the System Translations application.
In case you want to limit quantity only for a particular product or product group (not for the total sum of items in the cart), you need to go to the Products module and edit the particular product or product group and set its own limits also on the Advanced tab.
Cart Attachments
Cart attachments settings are connected to the Order Attachments addon that allows your customers to upload attachments for ordered products directly into the cart (using the Cart Attachments form).
Attachment Size Limit is a setting used only for the Cart Attachments form. It defines the maximal size of one attachment uploaded by a customer using this widget. A customer cannot upload bigger attachment. If this situation occurs, a system message The attachment file size is too large, the maximum size is %s MiB. appears. You can change it according to your needs in the System Translations application.
Cart Attachment Size Limit is a settings used only for the Cart Attachments form. It defines the maximal size of all attachments in the cart. If this situation occurs, a system message The size of all attachments in the cart is too large, the maximum size is %s MiB. appears. You can change it according to your needs in the System Translations application.
Resize Image to Width - insert the maximum width (in pixels) to which will be attached images resized.
Resize Image to Height - insert the height width (in pixels) to which will be attached images resized.
Note
Image will be resized proportionally to the largest size that fits the given width and height. If you insert only one dimension, image will be resized proportionally.
E-shop Limits
Advanced tab allows you to set up limits for your e-shop. Limits can be applied to an order amount. Order amount limits limit the minimal or maximal amount of order - your customer’s order needs to be in the enabled range of amount to process the order. Your customer won’t be able to buy anything over the limit set here.
Click the New button and define the currency in which the range will be defined. A Number inserted in the Minimum Order Amount field is excluded in the range, a number in the Maximal Order Amount is included in the range.
Remember that you can define this limit for as many currencies as you need.
Cash Register Settings
Cash Register settings are available only on accounts with the Cash Register addon.
If you want to create cash register orders, you have to create a new E-shop settings of the Cash Register type. Its settings are basically the same as for the standard e-shop settings. Some irrelevant fields are hidden (For Online Sale, Unpriced Products, Unstored Products, Manual Stock Dispatches, Register Customers) and other are newly available:
Default Currency
Default Zone
Default Customer Tax Category
Default Delivery Service
Default Language
Default Locale
These settings allows you to define default values for particular properties listed above that will be automatically used when creating a new cash register order. You are available to change them when creating a new order using the Settings button in the right upper corner (in the Cash Register application in the Sales module).
Note
If you want to use a registration of sales service, we recommend you to create a new branch. Branches are directly connected to a registration of sales settings and you will probably need to differ the registration of sales settings for online store and cash register (POS terminal ID).
Documents Tab
On the second Documents tab the documents generated for parciular orders created with these settings are defined. The sales receipt for most cases (but you can define invoice or credit note too!).
Sales receipt is a document generated for the cash register orders. It is an accounting document. For more info please see the Sales Receipt template section.
Accounting Tab
As for the standard e-shop type, there are all accounting settings available. Please don’t forget to add document sequences for the sales receipt document and orders.
Note
Cash register orders are created in the Cash Register Orders application located in the Sales module.
Registration of Sales Services
This application is used to register your sales.
Notifications tab
On the Notifications tab will be all payments (on which the registration of sales is applied - according to the payment methods selected on the first tab) displayed together with its state:
Notified - OK, the payment has been successfully notified.
Created - the first state. Used for newly created payment, it will be changed immediately to the next state (ready).
Ready - the second state. It is displayed before the first notification attempt (notified or one of the error states will be displayed next).
Communication error - the online service for payment registration has not answered correctly. The registration attempt will be repeated acoording to the Repeat on Failure and Repetition Count settings.
Error - if this state appears, please contact us immediately.
Settings error - there is an error in your settings (most like with the certificate, such as wrong password). Please check your settings and sent the payment to the registration manually using the Norify button in the toolbar.
Stopped - this will be displayed in case the settings have been deactivated before the payment has been notified.
Document Sequences
Document Sequences application allows you to define how to generate unique numbers, which are subsequently assigned e-shop or stock documents:
E-shop Documents: Credit Notes, Invoices, Orders, Packing Lists, Proforma Invoices and Sales Receipts
Stock Documents: Issues, Receipts, Supplier Orders and Transfers
E-shop Settings: Payment Notification (used in the Registration of Sales Services setting)
In this application you define a Mask, which is a string of arbitrary characters combined with special Document Sequences marks:
current year (format {YYYY} inserts an actual year)
sequence of numbers (format {xxxx} inserts a four-digit number. First generated will be 0001)
Hint
Mask OR{YYYY}-{xx} generates first document sequence as OR2015-01 (in case the actual year is 2015).
Created Document Sequences have to be used in the E-shop Settings or Stock Services applications (according to its type). In this application you only prepare the way how the particular Document Sequences will be generated, to use them for real Documents you need to select this afterwards in the E-Shops Settings or Stock Services applications.
Note
In case you have been using a sequence for some time (documents exist with generated sequences assigned) and want to change it, remember that if you edit an existing one, the sequence of numbers will continue. For example if you have sequence “OB-{xxxxx}” (last generated and used sequence is “OB-00154”) and change it to “OR-{xxxxx}”, the next generated sequence will be “OR-00155”. If you want to start the number sequence from the beginning, you have to create a brand new Document Sequence and assign it to the E-shop Settings or Stock Services applications (according to its type).
Create Document Sequence
To create a new Document Sequence, run the Administration module and the Document Sequences application. You have to click the New button and fill in at least all required fields:
Name (required) that is never visible to visitors (or customers) and serves only for your own purposes.
Internal Name (required) has to be unique within the Document Sequences application and serves only for BizBox Admin purposes.
Description (optional) is intended to provide a short information about this Document Sequence. It’s only for your own purposes and it’s never visible to visitors.
Document Type (required) selects the type of Sequence you want to create. You can create Sequences for Credit Notes, Invoices, Issues, Orders, Packing Lists, Proforma Invoices, Receipts, Supplier Orders and Transfers. Here you have to select one of these types.
Mask (required) is a field to which you type the format (pattern) of the Sequence. You can insert arbitrary characters and special marks: format {YYYY} inserts an actual year and format {xxxx} inserts a four-digit number (generation starts at 0001).
Unify Document Sequence is available only for Invoice, Proforma Invoice and Credit Note document types. Set this option to YES if you want to unify the number of the created/edited document with the order number. If so, select the order document in the Unifying Document below. In the created/edited document sequence, X and Y will be replaced with the same inputs as in the selected document (order).
Reset on the New Year’s Day setting allows you to automatically restart the counter seqence that is in the mask defined by the {XXXX} string. On the new year’s day it will start from the 1 again. The reset date and time will be set according to the time zone selected in the Administration module in the Account Settings application.
Key Storages
The Key Storages application is a deposit of license keys/codes for products that you sell on your online store. You connect a key storage with a product to which those keys/codes belong. Keys/codes are distributed automatically after successful payment of an order, which contains product with connected key storage (to make this work, you have to set the Product Dispatch settings for the product). It means that after you create the Key Storage, you also have to set the Product Dispatch settings, and go to the Products and set this Key Storage for a product for which you want to distribute keys/code automatically after a customer makes the payment. You have to set the BizBox Electronical as the Delivery Service for a product to make it available to select a key storage.
Create a new Key Storage
There are two types of Key Storages you can create:
Key Storage - key storages are used to create a deposit of license keys for software.
Voucher Storage - voucher storages are used to connect an existing voucher codes (voucher settings) with products (to sell coupon cards).
To create a new Key Storage, click the New button and select the type you want to create.
For both, you have to set its basic information on the General tab: required Name, which is only for your own and BizBox Admin purposes and is never visible to visitors or customers. Description is a field for short description of this Key Storage. It’s only for your own purposes and it’s never visible to visitors.
For Voucher type, there is a Voucher Template selection. Here you have to choose an existing voucher settings which contain particular codes which will be distributed (sold) as a gift cards.
For Key Storages, there is the Keys tab. It serves for direct insertion of the license keys you want to distribute to customers. By clicking the Add button you can start typing them in the Keys field. You can add more keys at once – one line in the Keys field represents one key. Key Assign Limit defines how many times the inserted Key (or Keys) can be used. That means a Key Assign Limit value of a unique Key has to be 1. In case you want to create a Key without assign limit, fill in the value 0. Valid Until field defines the date until that will be this Key (or Keys) distributed to customers. After this expiration date the Key (or Keys) won’t be distributed. BizBox will not warn you about the expiration, you have to check it manually.
Keys for Preview tab (available for key storages only) allows you to insert Keys for testing. You define them just like real Keys, but those are used for testing and previews of your e-shop. So you don’t have to use the real official Keys for tests. In case you define Keys for Preview, it will be used automatically for previews and tests of your Website.