Master Products
Master Product is used to unite similar products that are basically the same but differ in a variant (or variants). For example, this can be clothing in various sizes and colors. Master Product unites particular products from your catalog and you can use it on the website to display it as a single product with variants - for our example, customers can select the color and size (and a particular single product from your catalog which has the required Custom Properties defined is selected).
The main purpose of Master Products is to display all united products as one (in the Product Catalog Component in the Product Detail and Product List Views) with particular variants which are taken from the Product Group and are used to select one of the products connected to the Master one.
Working with Master Products
All information (descriptions, images, …) are defined for a master product. Here, in a master product detail, a Variants button is available. It serves you to define particular variants by its name, name in URL, code, EAN and the concrete variant (such as size or color) defined by the Product Group to which the master product belongs. You can work with them (create them) by clicking the Variants button in the toolbar. In other applications (Pricing module), you work with its variants.
There are two ways about how you can work with master products. Only one of it is available on your account (according to needs of your online store and product catalog).
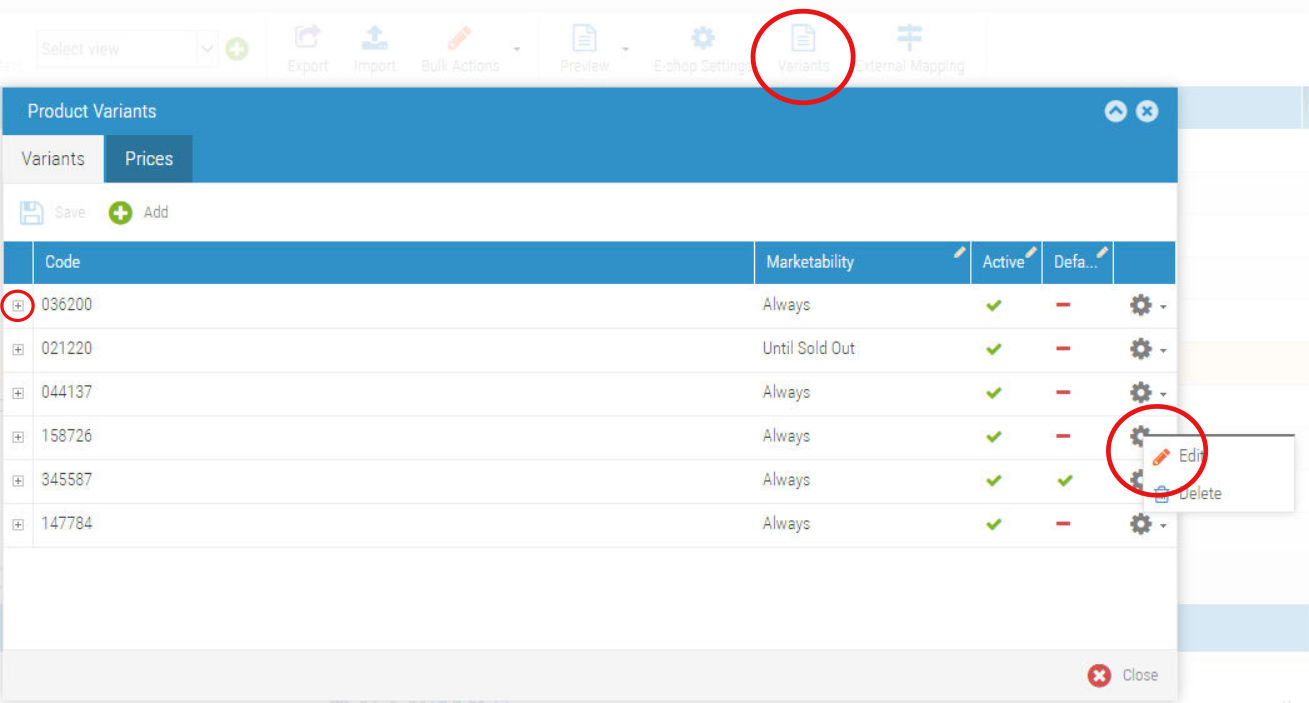
master products with fully editable variants (separated variants) - in the Product Variants window (after clicking the Variants button in the toolbar) has every variant the possibility of full edition. Click the little cog on the right side of every variant and select the Edit option. A full variant edition will appear. In the Products application both master and single (variants) products are displayed and can be edited.
master products without fully editable variants - in the Product Variants window (after clicking the Variants button in the toolbar) only the base edition is available. Particular single products are not visible in the Products application, you can work with them (edit them) only by clicking the Variant button in the toolbar.
Create a new Master Product (click the New button in the Products application toolbar) and define all information, that will be shared among all its variants (description, images, …). Assign a Product Group to this master product. It should have at least one Custom Property that is marked as Master Property defined. Master Property means that the value of this property is different for every one of the connected products. Custom Properties without this flag can be the same for all connected products (and are also defined directly on the Master Product). In such a case, particular product variants are on the website available in the product.productVariants parameter.
You can also create a product group without defined master property. In such a case, particular product variants are on the website available in the product.productVariants parameter in a form of a numbered index.
Save this Master Product and click the Variants button in the toolbar. A new window with two tabs will appear. On the first tab (Variants) are defined particular variants to the edited Master Product. Add a new variant, insert its name, name in URL, marketability and current activity together with the particular master variant (according to the Product Group to which is this master product assigned). Save it. To define variants ordering, you can drag-and-drop them (this order can then be reflected on the website (according to the template settings). You can and also define the default variant (optionally) – the default variant can be used in the template as the mail product (variant) of the master product. It is possible to specify multiple default variants; on the website, the first one in order is then taken as the default. Typically, this feature is used when not all variations are available for all e-shops. If no default variant is available, the first in order is taken as the default.
On the right side, the action button is available. It allows you to delete or convert particular varianat to the single product.
On the second Prices tab can be prices for particular variants added (you cannot assign a price for master products). On this tab, volume prices can be added. For more info please see the volume prices section. To add a new volume price, edit an existing price. In a new window you can click the Add button and fill in the From Quantity and Price. If the inserted quantity is in the cart, it will be applied to one unit of this product.
Convert to Standard Product
All variants can be converted to the single product (standard non-variant) by using the action button on the right (in the Variants window). Here select the Convert to Standard Product option.
In the master products without fully editable variants version can be the variant conversion to standard product performed in tge variant detail as well. On the General tab in the Master Product setting select the - None - option.
Delete Variant
To delete a variant, click the action button on the right (in the Variants window) and select the Delete option.
Note
Single (standard non-variant) products are not touched with this setting at all. They are available in the application as usual.
Product Groups
The Product Groups application allows you to define and manage particular Product Groups that are used to group Products with similar properties (Master Products). The main function of Product Group is to define Custom Properties, which are common for all Products from this Group. Those Properties are subsequently displayed in particular Products settings on the Custom Property tab, where you can define the properties you added to the whole Product Group.
Note
You can use bulk actions (button in the toolbar) to add a custom property to multiple product groups at once.
Product Groups application does not allow you to add Products to Product Groups. To add a Product into Group you have to edit the particular Product and select the Group in Configuration.
How to add a new Product Group
Click the New button located in the toolbar.
Name is a required field that serves only for your purposes and is never visible to visitors.
Internal Name is required and serves for internal system purposes. Internal Name must be unique within the Product Groups.
Description is optional and serves only for your better orientation in your Product Groups.
Advanced Tab
Aggregate Variants to Calculate Volume Prices setting will allow the volume price to be calculated for all variants in the cart. The price is taken according to the volume price set on the default variant.
The aggregation takes place only if there is more than one variant of the product with enabled aggregation in the cart.
The default variant and the sum of the quantities of all variants are used to determine the volume price.
The price found will be used as the price of all variants (if it is a volume price).
If the price for the default variant is not found or it is not a volume price, then the price for the product and quantity of the item is searched.
Example: Variant A costs 5 EUR, variant B costs 8 EUR and from 50 pieces it costs 3 EUR, variant B is the default. There are 20 pieces of variant A and 10 pieces of variant B in the cart, the price for A will be 20 x 5 EUR and the price for B will be 10 x 8 EUR. This is because 20 + 10 = 30 pieces, for option B, the quantity price for 30 pieces is not defined, so price A is used.
On the Advanced tab, the Cart Constraints can be defined:
Minimum Quantity - you can numerically set the minimum number of items of products from this product group that your customer can buy. A customer won’t be able to place an order which does not contain the defined minimal quantity of products from this product group.
Maximum Quantity - you can numerically set the maximal number of items of products from this product group that your customer can buy. A customer won’t be able to place an order which contains more than the defined maximal quantity of products from this product group.
In case you want to control the number of all items in the shopping cart or the total amount of the order, you have to go to the Administration module in the E-shop Settings application. Here (on the last Advanced tab) you can set limits for the shop as a whole and not only for one particular Product.
You can also use cart constraints for particular products to control the number of products on an order.
Custom Properties
On the Custom Properties tab you can define particular properties that you can set for every product from a product group or a manufacturer, brand or product category.
If you want to add a new custom property, go to a particular product group, manufactuter, brand or product category detail and click the Custom Properties tab.
Click the Add button:
Name is a required field that is displayed to visitors, because it is the name for the value you will select as a Type below. The Type field allows you to select the Type of a new Custom Property:
Internal Name is also required, but used only for internal purposes. This name has to be unique within the Custom Properties.
Comment is your own internal commentary. It will be used as a tooltip for particular custom property (when you place the cursor over a custom property name in particular product detail).
Public – enable if you want the custom property to be displayed within the comparator.
Filterable – enable if you want the custom property to appear on the web. This is the functionality of the template (so you may need to customize the template).
Master Property (available only for product groups) flag defines, if the current property will be used as the main one (one axis). It means that the value of this property is different for every one of the connected products. Custom Properties without this flag can be the same for all connected products. Master Property defines the variants (differences) of the connected products (this can typically be a size, shape or color). A select box with values from these properties is subsequently displayed on the Product Detail and customers select the desired value and this product is added to the cart.
Boolean inserts a flag with YES/NO option. This Type can be used for example as a sign of certification.
Date inserts field for a date you will select. This Type can be typically used for a definition of an expiration or production date.
Date-time inserts a field for a date and time you will select.
Long Text inserts a text field in which up to 2 000 characters can be inserted.
Multiple Product Variants - allows you to select multiple values from pre-created Product Variant.
Number allows you to insert a number. This Type can be used for example for defining a size.
Product inserts a field which allows you to search for an existing product from your product catalog.
Product Variant is a list of values. It inserts a new field with a selection of previously created Product Variant you want to use. This can be typically used for properties such as a color, size or material.
Text inserts a text field and you can type your own text string in it.
Text Content inserts a select box which allows you to select an existing Text Content from the Contents application located in the Author Tools.
Default Value field is optional and allows you to define the value that will be preselected in this field for particular items (products, manufacturers, brands or categories) as a default.
Particular values for products are inserted on the Custom Properties tab in the product detail. Particular values for manufacturers, brands or categories are inserted on the Custom Properties tab in the item detail.
Product Variants
Product Variants application allows you to define particular variants (properties) of products you sell. Typically it can be a color, size, material or another property. Defined variants are common (can be added) for all product groups. Product variant contains enumerations of values.
You use them in Product Groups, when defining the Custom Properties (more accurately in the selection of List of Values Custom Property Type). Product Variants are necessary for the Master Products.
For a particular variant value has to be set its value and internal name. If the value is a color, you can define its hex code. You can also insert multiple hex codes divided by ‘/’ (such as #B23D77/#00C2F2).
Icon field allows you to select an image from the File Manager, Description can be used to provide more information that can be displayed on the website.
Note
You can drag and drop particular variant to change its order. On a website, the variants are ordered according to their order in this application.
Import Product Variants
Particular product variants can be imported directly from the Product Variants application. Here, in the toolbar, the Import button is available. Click it, select the import type and upload a file which you want to import. See the list of column names below.
Colum Name |
Description |
|---|---|
internalName |
Required, unique internal name of the variant. |
variantValue:en |
Required, the particular value of the variant (this can be displayed to your customers). |
color |
Optional, the color value. You can also insert multiple hex codes divided by ‘/’ (such as #B23D77/#00C2F2). |
description |
Optional, the description of the variant. |
icon |
Optional, the icon (image) of the variant. Insert the path to the File Manager, such as /eshop/images/icon.png. |
order |
Optional, insert the number that determines the order of the product variant. |
productVariant |
Required, insert the internal name of the product variant to which will be this variant value imported. |
Export Product Variants
You can export all existing product variant values. Go to the Product Variants application and click the Export button. Export can be used to make bulk changes (export, change, import).
Select the language, export range of the export and click the Export button. After a short while your export will be prepared and after that you can save it to your computer. Export can be edited and imported back using the Import button in the toolbar.
Display Master Product
To display Master Product on a website (in widget or Product Catalog Component) you need to use a special parameter product.masterProduct (or component.product.masterProduct in the component). It is an array which carries information about Master Product of a particular product. Within this parameter are all other Master Product paramaters available.
Parameter |
Type of a Parameter |
Short Parameter Description |
|---|---|---|
component.product.masterProduct |
Array |
Unites all masterProduct parameteres listed below. |
component.product.masterProduct.name |
String |
A name of the Master Product (you can display it in the template). |
component.product.masterProduct.id |
Integer |
A unique internal ID of the Master Product. |
component.product.masterProduct.code |
String |
A unique code of the Master Product. |
In a widget, use the same parameters without the component part.