My BizBox
My BizBox module lets you personalize your own BizBox account.
You can run this module by clicking the small arrow next to your name.
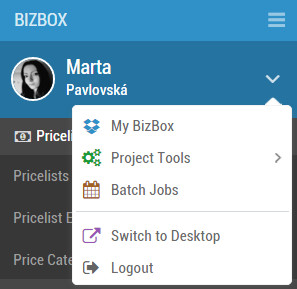
For managing the accounts for all your BizBox co-workers use the Administration module (Users application).
Profile
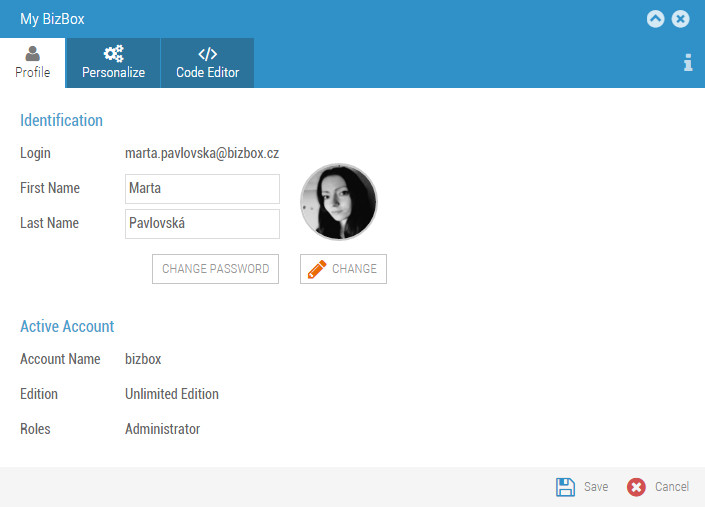
Identification
The data displayed here are all about you. Here you can see your login, name and avatar. You can upload a picture of yourself directly from your computer. Notice the Change Password button which allows you to define a new password used to log into BizBox.
Active Account
Active Account displays information about the current account and its basic settings (edition and your role).
Other Accounts
All independent accounts in which you participate are displayed here. You can easily switch between them.
Personalize
Personalize settings are intended to personalize your account to make your work in BizBox Admin comfortable and suitable for you.
Data View
Data View sets the multiple selection of the records in the Data View. You turn on/off the display of the check-boxes you can use for multiple selection. Alternatively you can press and hold the Ctrl key and select the records you want to work with.
Applications
Applications sets the opening of tabs for Applications that you have run several times at the same time. New Application tab is opened only once (for the first time you run the Application). Regardless of how many times you will open the Application again, it will be reopened in the first created tab. Or you can always open Applications in a new tab, so you will have as many opened tabs as many times you run the Application.
Localization
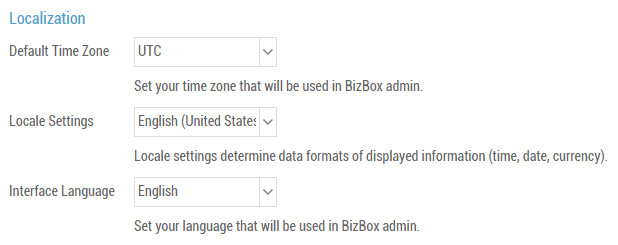
Localization allows you to define your Time Zone (affects the system clock) and Locale Settings. Locale Settings determine the data formats of displayed information, such as time, date or currency. The difference between the Localization settings in the Administration and the ones here is that the settings here are only for you, but the settings in the Administration are common for all BizBox users. It means if you set the Localization in the Administration, all users will inherit this setting in their My BizBox, where they can change it.
PDF
Define how will be PDF documents displayed.
UI Mode
Select how will be BizBox UI displayed as a default.
Editors
Here you can set the default Editor - the one that will be automatically used when you will create some content in the Content tab. In case you want to switch between the editors, you have to set this setting here. There are 2 main types of Editor which you can use:
Code Editor is the ACE Editor. It is used for editing the source code, so it is necessary for you to know how to code. You are creating a well-structured XML document.
Visual Editor is the CKEditor. It is the WYSIWYG editor that allows you to create content by simply using the buttons in the menu of this editor. That means that the content is directly displayed in the form closely corresponding to the final content displayed to the visitor. You are creating a formatted document (very similar to well-known word processors).
Record Detail
Select how will be the record detail in a grid view displayed.
Code Editor
Code Editor section contains the complete settings for the Code Editor you use for coding the Content.
Font and Colors
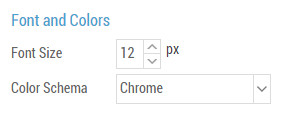
Font and Colors allows you to set the font size and color theme for the Source Code editor.
Visual Appearance
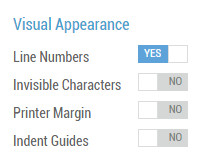
Line Numbers turns on/off the numbering on the side in the Editor.
Invisible Characters turns on/off the display of invisible characters in the Editor.
Printer Margin turns on/off the display of the printer margin in the Editor. Printer margins are determined by your printers’ limitations.
Indent Guides turns on/off the display of tiny vertical lines at each indentation level in the Editor.
Coding Settings
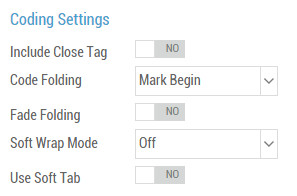
Include Close Tag turns on/off automatic insertion of the closing tag. It means that you will insert only the first tag and the second (closing) one will be inserted automatically.
Code Folding determines how the code folding marks will be used. Code Folding allows you to selectively hide and display code sections (so you can view only the subsections of code that are actually relevant to you). The manual option will hide them and then you must manually mark and hide the sections you want to hide. Mark Begin displays a tiny arrow (code folding mark) in the beginning of the folding, Mark Begin and End displays two tiny arrows in the beginning and the end of the folding. You can click those arrows to hide the content in between them.
Fade Folding turns on/off the display of the code folding marks.
Soft Wrap Mode determines the automatic wrapping of lines that are displayed on the screen.
Use Soft Tab turns on/off the usage of the tabs made up of space characters.